This article discusses Two-Factor Authentication (2FA) support in Sysgem Enterprise Manager (SEM).
2FA support is available in SEM version 3.0, from build 8206 onwards. For technical reasons it is not possible to make 2FA support available in SEM version 2.3 or earlier.
If you are running SEM version 2.3 but wish to add 2FA support to your SEM installation, please contact Sysgem to discuss an upgrade to SEM version 3.0 – in most cases this can be as straightforward as installing a version 2.3 update, but version 3.0 includes other new features you may wish to be aware of when planning an upgrade.
Build 8206 of SEM includes support for two authentication methods:
In both cases users can use smartphone apps such as Google Authenticator to authenticate themselves during login; such apps are configured either by scanning a QR code or by manually entering the authentication details provided by SEM. There is currently no support for enrolling hardware tokens with known key material; if this is a feature that would be of interest in your environment, please contact Sysgem.
Note that not all authenticator apps support HOTP properly – for instance, the Microsoft Authenticator app will silently accept a QR code that specifies HOTP authentication but then handle it as TOTP instead. As a result, Sysgem recommend using TOTP-based authentication unless you have specifically validated HOTP-based authentication in your environment.
In order to make use of 2FA, your SEM Authorization Server and Management Consoles must all be version 3.0 build 8206 or later. You can still use older Management Console builds to log in to the build 8206 Authorization Server, as long as 2FA has not been enabled for the relevant SEM user account; if it has, the login attempt will be rejected.
There is no need to upgrade any SEM Agents, Proxy Servers or application modules to make use of 2FA.
The SEM Authorization Server stores all 2FA-related authentication data in an ODBC database; Sysgem recommend that a SQL Server database be used for this purpose, both so that it can easily be shared between multiple Authorization Servers (e.g. a primary and a disaster-recovery server) and because this data is critical to ensure availability of the SEM application once 2FA has been enabled. However, for evaluation or demonstration purposes, SEM can also create and make use of a simple Microsoft Access database for 2FA details.
Since such ad-hoc databases might escape your organisation’s backup or data security policies, and cannot be shared between Authorization Servers easily, Sysgem do not recommend using this Access database for production systems.
Before SEM’s 2FA support can be used, it must be explicitly enabled on the SEM Authorization Server. This is done using the new Two-Factor Configuration utility, which can be found in the Authorization Server’s installation directory or in the Sysgem folder of the Start Menu on the computer where the Authorization Server is running.
Starting this utility will display the following dialog box:
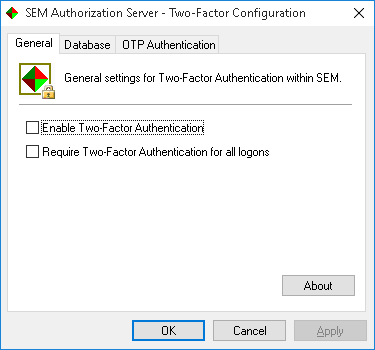
The General tab will be selected when the utility starts, and allows the global 2FA options to be selected:
Setting the ‘Require Two-Factor Authentication for all logons’ option when there are no users enrolled for 2FA will prevent you from logging in to SEM! In this case, you can clear either the ‘Require’ or ‘Enable’ settings, log in to SEM normally and then re-enable 2FA and enrol a new user, as described in the following section.
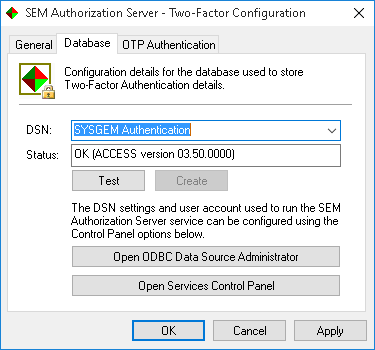
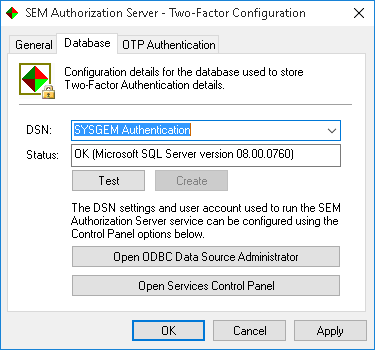
The Database tab allows you to configure the authentication database used for 2FA, and will show the following details by default:
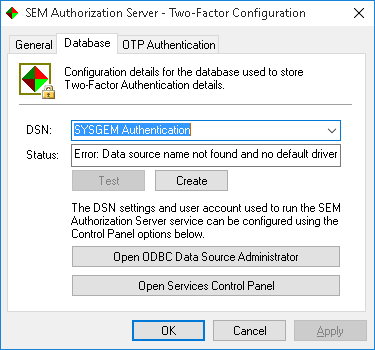
Note the error shown in the Status field, indicating that the authentication database does not yet exist. For testing and evaluation purposes the Create button will allow you to create a temporary Access database; once you have confirmed a message reminding you that such configurations are not intended for production use, the Status field will be updated to indicate the availability of the database:
For production use, Sysgem instead recommend using an SQL Server database. The ‘Open ODBC Data Source Administrator’ and ‘Open Services Control Panel’ buttons are provided to help with performing the required configuration, as follows:
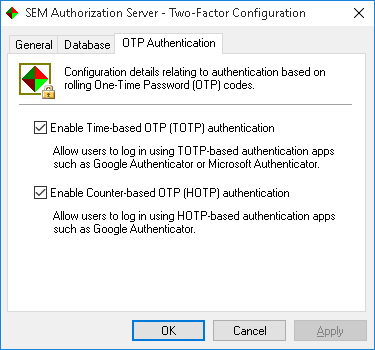
Finally, the OTP Authentication tab allows the TOTP and HOTP authentication methods to be configured. You can select which of these are available to users, for instance allowing you to disable HOTP if your users will be using the Microsoft Authenticator app:
Once the Authorization Server has been configured to support 2FA, enrolling users with the available 2FA providers is done through the SEM Management Console. As with any other SEM user management tasks, only users with the Manage Access Control profile permission can alter another user’s settings; this permission is usually granted to the System user, as part of the Full Access profile, so log in to the Management Console as System or another suitably-privileged user and use the Managers -> SEM Users -> Accounts option to display the User Accounts manager. Double-click on a user to open the Modify Account window:
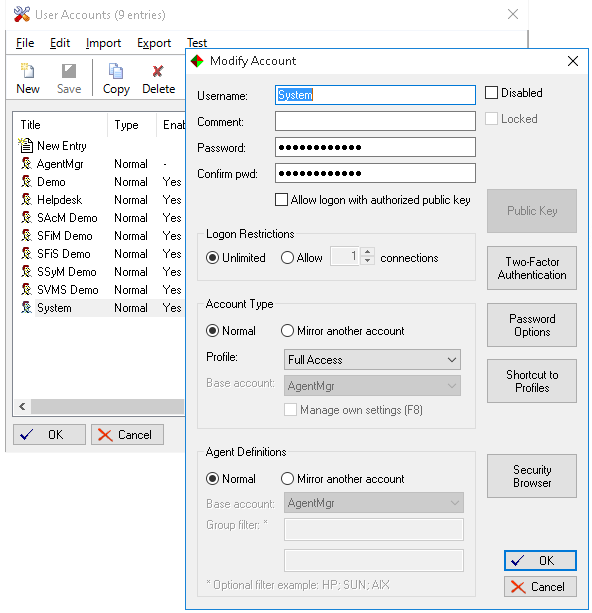
Clicking the Two-Factor Authentication button will open the user’s 2FA settings:
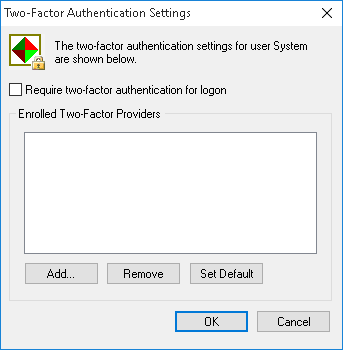
Here we can see that the user is not enrolled with any 2FA providers, so click the Add… button to start the Enrollment Wizard:
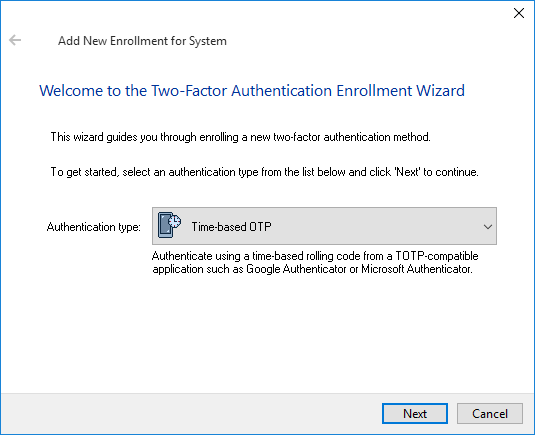
Select the 2FA type to enrol with, and click Next. The following screens may vary based on the 2FA type; the examples given here are for TOTP authentication.
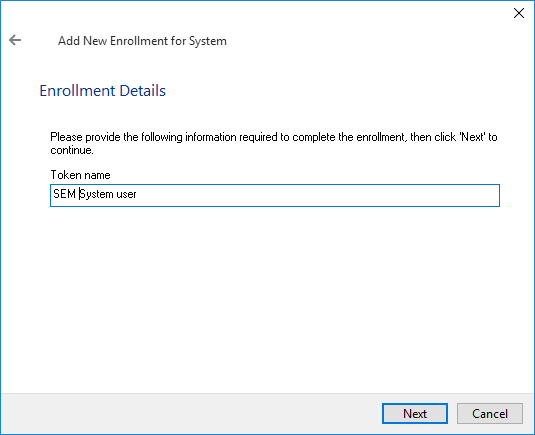
Provide a friendly name used to refer to the user’s TOTP authentication token in prompts and click Next.
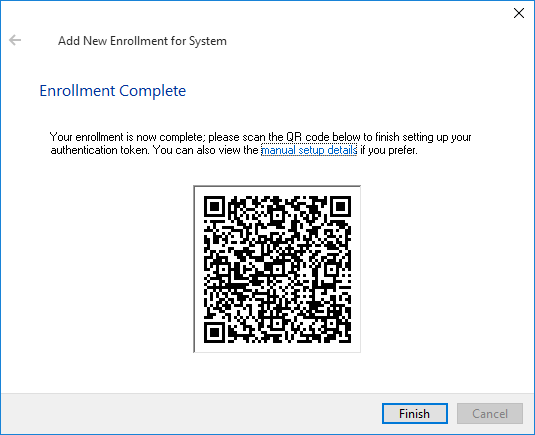
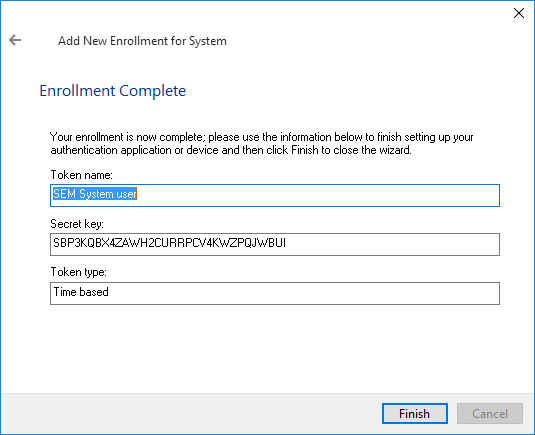
Scan the QR code with your authenticator app; if your app does not support QR codes or the code is not recognised, you can also follow the link to the manual setup details that should be entered into the authenticator instead:
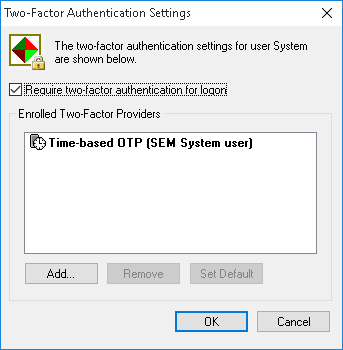
Once you click Finish in the wizard, you are returned to the user’s 2FA settings; the new authentication method is listed, and will be shown in bold to indicate that it is the default authentication method for the user. Tick the ‘require two-factor authentication’ checkbox to enable 2FA for the user:
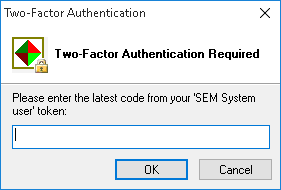
Click OK on this dialog, the Modify Account dialog, and the User Accounts manager. You can now start another SEM session and attempt to log in as the newly-enrolled user; you should be prompted to authenticate using the new TOTP token:
In most cases, users should be allowed to enrol themselves with 2FA providers, rather than relying on SEM administrators to enrol them – particularly as the enrolment process requires access to the device and app the user will be using for authentication!
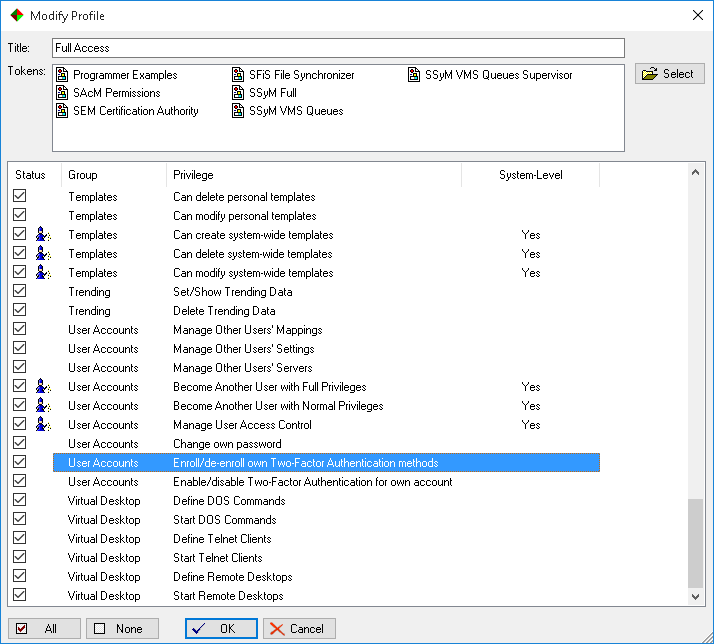
There are two new profile permissions that control what 2FA settings a user can manage on their own behalf; these are ‘Enroll/de-enroll own Two-Factor Authentication methods’ and ‘Enable/disable Two-Factor Authentication for own account’. These permissions will not have been enabled by default after upgrading to build 8206, so use the Managers -> SEM Users -> Profiles option to grant these permissions in the profiles used by the relevant SEM users:
You do not have to grant both permissions; for instance, to specify that certain users must log in using 2FA, grant the them ‘enroll/de-enroll’ permission but not the ‘enable/disable’ permission. This will allow users associated with that profile to control how they authenticate (by setting up their own authentication methods) but not disable 2FA (which you can enable on a per-user basis through the User Accounts manager, or globally through the Two-Factor Configuration utility on the Authorization Server).
When a user has been granted either of these permissions, a new ‘Two-Factor’ button is available in the user’s Tools -> Change Password dialog. This button brings up the same Two-Factor Authentication Settings window available through the Modify Account window, from which a user can make whichever changes their profile settings allow.
SEM allows each user account to be enrolled with any number of 2FA providers; this can be used to provide a fallback authentication method for critical accounts in the event that their usual authenticator device becomes unavailable.
To do this, simply repeat the enrolment process for each additional authentication method; the additional enrolments will appear in the list alongside the default authentication method:
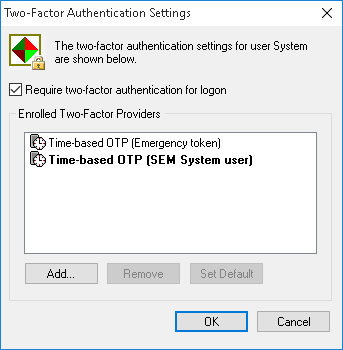
SEM will always prompt for the default authentication method first when logging in. The authentication method list shows this default option in bold. To change it, select the desired default in the list and click Set Default.
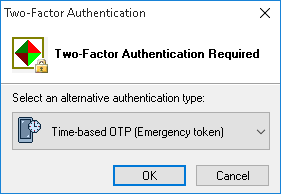
When multiple authentication methods are available, the 2FA prompt shown during login will include a link to select an alternative authentication method:
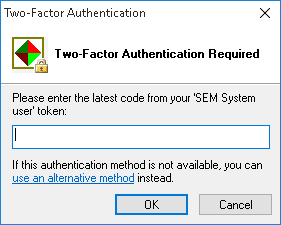
Selecting this link instead of answering the authentication prompt will display a list of available authentication methods; select the desired method in the drop-down and click OK to restart the authentication process using the new authentication method.
Note that currently SEM only requires that user be able to authenticate themselves using any one of their available authentication methods. As Sysgem extend SEM with authentication methods beyond OTP apps, it may become possible to designate certain methods as necessary but not sufficient – e.g. to require both an OTP code and an authentication e-mail address for the System user.
If you can't find an answer to your question in our knowledge base, please feel free to contact our support team.
Find answers to common support questions in our Knowledge Base.
If you require support with an issue not listed here, or have any other enquiries, please contact us.
© Sysgem AG, all rights reserved.
Sysgem is a trademark of Sysgem AG. Other brands and products are registered trademarks of their respective holders.
Sysgem AG, Forsterstrasse 67, CH-8044 Zurich, Switzerland
+41 44 586 1060